1. Capturing Data with Windows Easy Transfer
The following steps show you how to capture data on a
system using the Windows Easy Transfer tool. If you are running it on
Windows XP, you'll first need to download and install it. These steps
show how it can be run on one computer to capture the data and then
restored onto a Windows 7 computer:
Start the Windows Easy Transfer Wizard by clicking Start => All Programs => Accessories => System Tools => Windows Easy Transfer.
Review the information on the Welcome screen and click Next.
You'll
see a prompt asking you how you want to transfer the items. You can
choose an Easy Transfer Cable (if you have the special cable and the
computers are connected with it), a network share, or an external hard
disk or USB flash drive. For this example, choose an external hard disk
(if you choose one of the other options, the steps will be slightly
different).
You'll be prompted to choose either This Is My New Computer or This Is My Old Computer. Click This Is My Old Computer.
The
Windows Easy Transfer wizard will then scan all the existing user
accounts on the system to identify what files and settings can be
captured. When it's complete, you'll see a listing of all the users who
have profiles on your local computer.
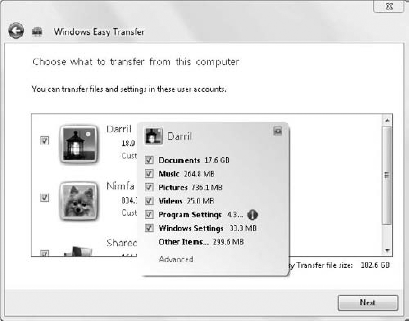
Click Customize on one of the user profiles. You'll see a display similar to Figure 5. You can click on any of the items to deselect or reselect them based on how much space you have and what you want to transfer.
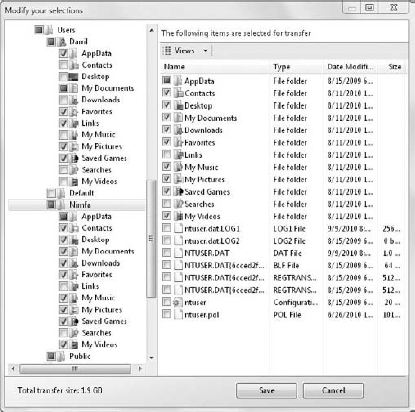
Click Advanced. You'll see a screen similar to Figure 6.
Notice how you can pick specifically what will be transferred. Instead
of using the wizard, you can use traditional methods to back up user
data and just focus on using the wizard to transfer the settings.
However, you can also use it to copy all the user data. Select the items
you want to transfer and click Save.
You'll
be prompted to provide a password. Enter a password that you'll
remember in the Password and Confirm Password text boxes. For a lab
environment, you can use something like P@ssw0rd. Click Save.
Select
your external hard drive and click Open. If desired, you can create or
browse to a folder on the drive. Click Save. The wizard will begin the
process of saving the files and settings to this location.
At this point, take a break. For a transfer of about 2 GB, it may take your system about 5 minutes.
When
the transfer finishes, the wizard will indicate the save is complete
for each of the users with a green check mark by the user icon. Click
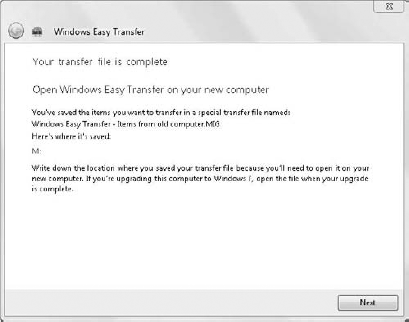
Next. You'll see a screen similar to Figure 7. Notice that this identifies the name of the file that holds all the data and settings: Windows Easy Transfer - Items from old computer.MIG. It also identifies the location (drive M: in the figure).
Click Next and click Close. At this point, the files and settings are ready to be imported into the new computer.
2. Restoring Data with Windows Easy Transfer
Once you have saved the files and settings into a
file, you can then use the following steps to restore them onto the
Windows 7 computer:
Start the Windows Easy Transfer wizard by clicking Start => All Programs => Accessories => System Tools => Windows Easy Transfer.
Review the information on the Welcome page and click Next.
Select
the method you used to transfer the files. In these steps, I'm using an
external hard disk. If you use another method, the steps will be
slightly different.
Select This Is My New Computer.
The
wizard will ask if you have already saved your files to an external
hard disk or USB flash drive. Ensure the external drive is connected to
the new computer and click Yes.
Browse to the location of the Windows Easy Transfer file. It is named Windows Easy Transfer - Items from old computer.mig by default. Select the file and click Open.
Enter the password you used when creating the files and click Next.
You'll
see a screen showing the same usernames that were detected and saved
when you captured the data. By default, each of the profiles and the
shared items are automatically selected. Deselect any users you don't
want to migrate, or click Customize to pick items to transfer.
Click Advanced Options. You'll see a screen similar to Figure 8.
You can use the options on the Map User Accounts tab to map the profile
of the account on the original system to the profile of the account on
the new system. This step can be useful if the account name is
different. You can also create a new account using this tab. However, if
an account doesn't exist on the new computer but the profile is
selected to be transferred, the wizard will automatically create the
account with the same username. Therefore, it's not necessary to create a
new account unless you want the data to be migrated to an account with a
different name.

Click Cancel, then click Transfer and the wizard begins the transfer process.
When
the wizard finishes, it will indicate that the transfer is complete.
You can click on either of the links to view the Windows Easy Transfer
Report. You can also view the report later by clicking Start => All Programs => Accessories => System Tools => Windows Easy Transfer Reports. This allows you to view the data that was transferred at any time in the future.
Click Close. You'll be prompted to restart the computer. Click Restart Now.
When the system reboots, the settings from the
original computer will be in place. The user will immediately see the
settings from their original computer, such as the wallpaper, data in
their libraries, and settings in applications such as Internet Explorer.
If the user has any of the same applications known to the Windows Easy
Transfer tool installed in both operating systems, these settings will
also be the same.